Qiankun
尽管 single-spa 可以根据路由进行应用切换,内置了应用的状态和事件处理,但是它缺少了微应用的隔离和性能优化功能,qiankun 在 single-spa 的基础上进行了二次封装,加强了微前端的这些能力设计,包括:
- 应用隔离:微应用的 CSS 和 JS 隔离
- 加载方式:可以配置 HTML 地址进行微应用加载
- 性能优化:可以对微应用进行预加载
- 通信方式:可以实现微应用之间的互相通信

在 qiankun 中注册微应用时除了需要提供 name、activeWhen和 customProps 之外,和 single-spa 最大的区别是通过提供 entry 和 container 两个参数来代替 single-spa 的 app参数,开发者不需要关注如何加载微应用并识别微应用的生命周期函数,qiankun 内部会实现这些逻辑,从而简化注册流程
应用加载
qiankun 则自动提供了 CSS 的加载参数,只需要在上一个示例的基础上将微应用的 CSS 抽离出来,然后在 qiankun 注册 API 时配置 entry.styles 即可。
// vue.config.js

// vue.config.js
    const { defineConfig } = require("@vue/cli-service");
    const { name } = require("./package.json");
    const { v4: uuidv4 } = require("uuid");

    const port = 8080;
    const appKey = `${name}_${uuidv4()}`;

    module.exports = defineConfig({
      transpileDependencies: true,
      // 将 CSS 样式抽离出来
      css: { extract: true },
      filenameHashing: false,

      publicPath: `//localhost:${port}/`,

      configureWebpack: {
        optimization: {
          splitChunks: {
            chunks: "all",
          },
        },
        output: {
          library: appKey,
          libraryTarget: "umd",
          chunkLoadingGlobal: `webpackJsonp_${appKey}`,
        },
      },
      devServer: {
        port: port,
        headers: {
          "Access-Control-Allow-Origin": "*",
        },
      },
    });
主应用:
// src/utils/micros.js
    import { RegistrableApp } from "qiankun";
    export const MICRO_APP_CONTAINER_ID = "micro-app-container";

    export const MICRO_APP_ROUTER = {
      REACT: "react",
      VUE: "vue",
    };

    export const mockMicroApps: RegistrableApp[] = [
      {
        name: "react",
        title: "React Micro App",
        entry: {
          scripts: [
            "http://localhost:3000/vendors.js",
            "http://localhost:3000/main.js",
          ],
          html: `<div id="${MICRO_APP_ROUTER.REACT}"></div>`,
        },
        activeRule: MICRO_APP_ROUTER.REACT,
        container: `#${MICRO_APP_CONTAINER_ID}`,
        props: {
          microContainer: MICRO_APP_ROUTER.REACT,
        },
      },
      {
        name: "vue",
        title: "Vue Micro App",
        entry: {
          scripts: [
            "http://localhost:8080/js/chunk-vendors.js",
            "http://localhost:8080/js/app.js",
          ],
          // 新增抽离的 styles 样式
          styles: ["http://localhost:8080/css/app.css"],
          html: `<div id="${MICRO_APP_ROUTER.VUE}"></div>`,
        },
        activeRule: MICRO_APP_ROUTER.VUE,
        container: `#${MICRO_APP_CONTAINER_ID}`,
        props: {
          microContainer: MICRO_APP_ROUTER.VUE,
        },
      },
    ];
上面都是请求 JS 和 CSS 的地址来实现微应用的加载,但是在现实的业务开发中往往需要生成带 hash 的资源地址,如果采用固定地址的方式请求,则每次构建后都需要变更请求的地址。为了解决 hash 地址引入的变更问题,qiankun 提供了 HTML 地址的配置方式,从而使得开发者不需要感知 JS 和 CSS 的地址、数量和加载顺序。
// src/utils/micros.js
import { RegistrableApp } from "qiankun";
export const MICRO_APP_CONTAINER_ID = "micro-app-container";

export const MICRO_APP_ROUTER = {
  REACT: "react",
  VUE: "vue",
};

export const mockMicroApps: RegistrableApp[] = [
  {
    name: "react",
    title: "React Micro App",
    // entry 配置成微应用 HTML 的访问地址(注意该 HTML 地址必须支持跨域请求)
    entry: "http://localhost:3000",
    activeRule: MICRO_APP_ROUTER.REACT,
    // 将请求到的微应用 HTML 内容挂载到 container 元素上
    container: `#${MICRO_APP_CONTAINER_ID}`,
    // 由于微应用 HTML 中自带了可以挂载微应用的 DOM 元素,因此这里不再需要 props 提供微应用挂载的容器元素
    // props: {
    //   microContainer: MICRO_APP_ROUTER.VUE,
    // },
  },
];
import-html-entry
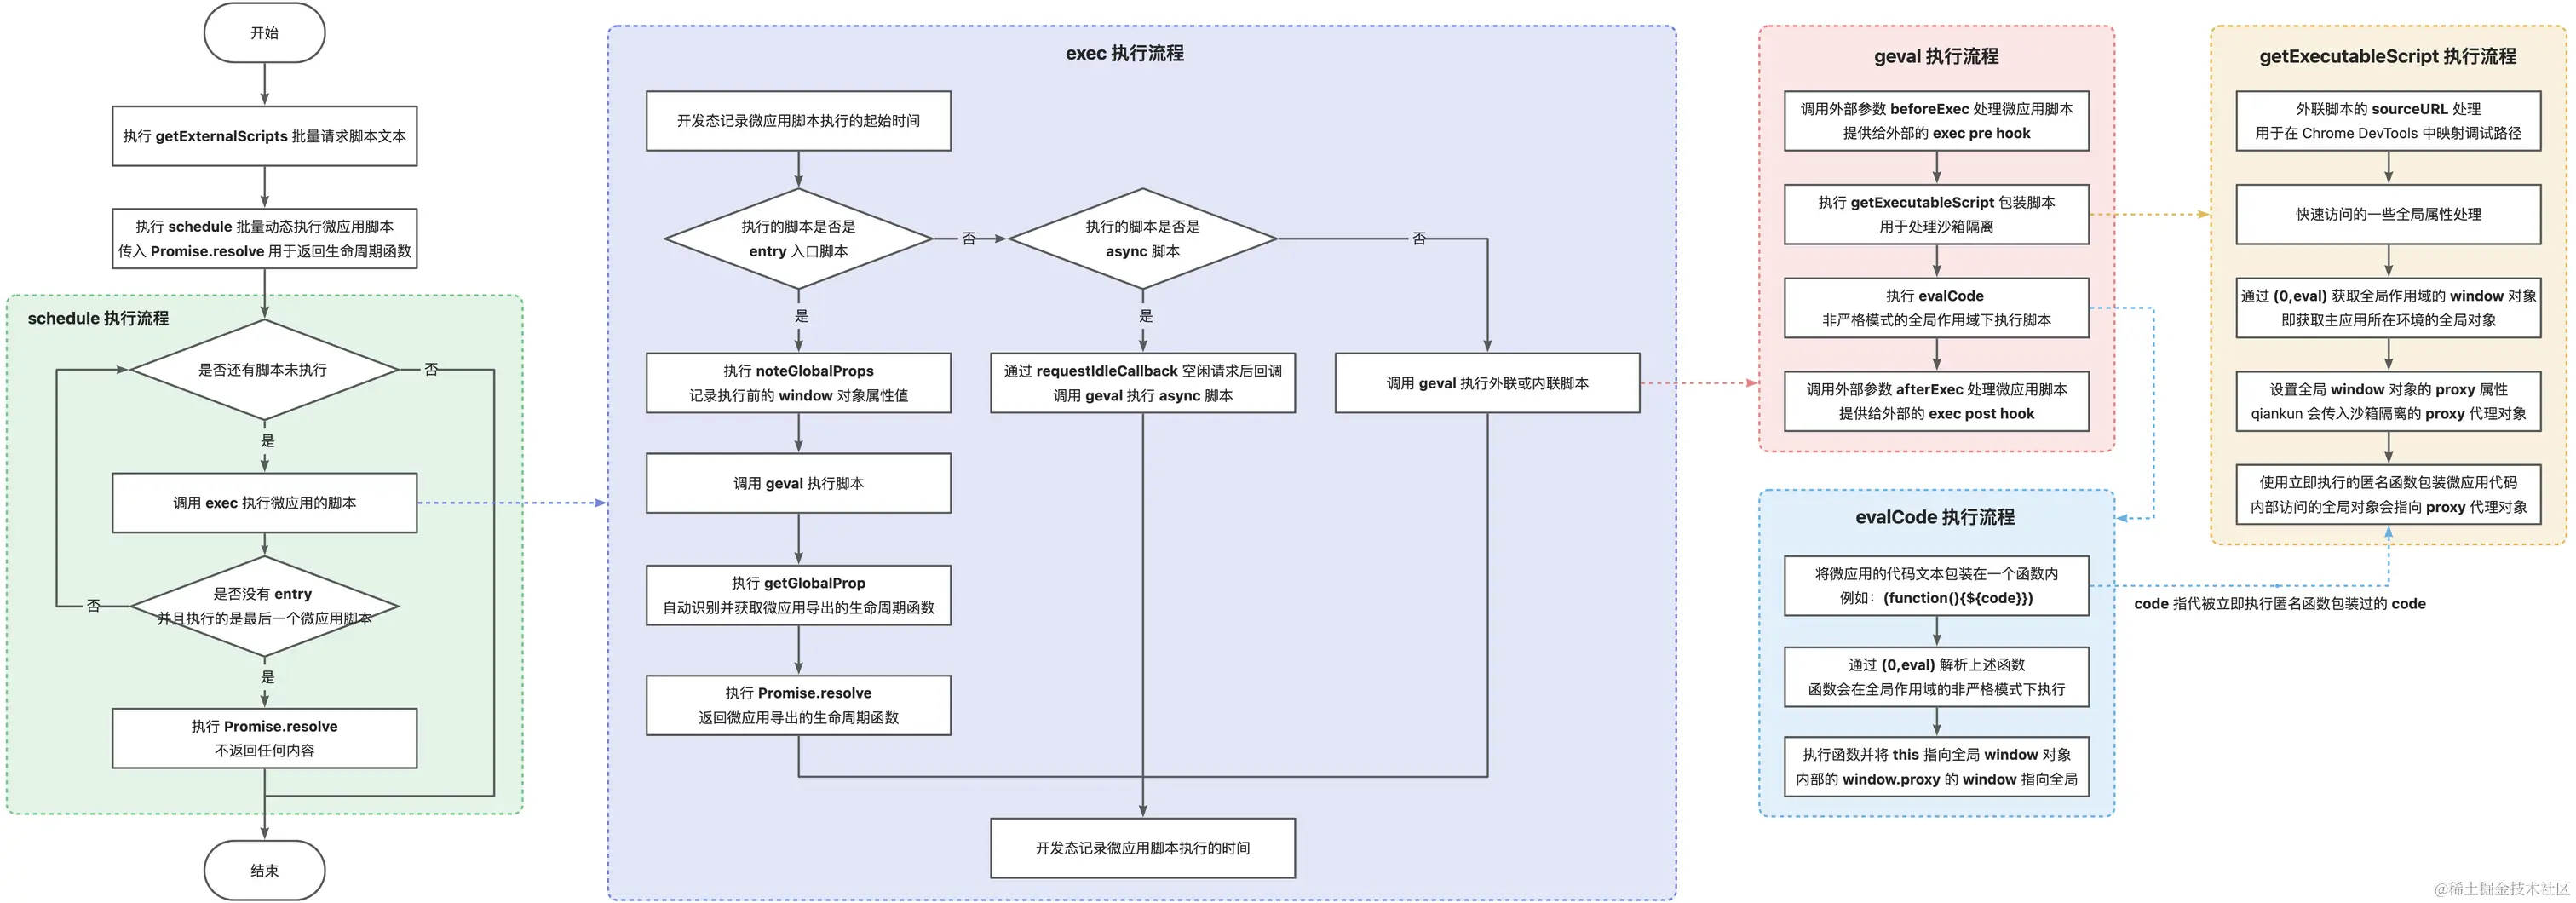
在使用 HTML地址引入的时候,qiankun 会通过 import-html-entry 库包请求并解析 HTML 文本内容,最终实现微应用的加载。
import-html-entry是一个被 qiankun 依赖的库包,它的主要作用是加载微应用,解析微应用导出的生命周期函数:
- 如果提供 HTML 地址,会请求和解析 HTML 文本,自动提取 JS 和 CSS 资源
- 请求外联 CSS 资源文本,通过内联的方式嵌入 HTML
- 请求外联 JS 资源文本,通过 (0, eval) 的形式动态执行脚本
- 识别微应用的入口脚本并解析微应用导出的生命周期函数提供给 single-spa 的注册参数 app
核心代码如下,template看import-html-entry-template:
// single-spa 使用 NPM 库包
import {
  start,
  registerApplication,
  LifeCycles,
  RegisterApplicationConfig,
  AppProps,
} from "single-spa";

// 这里本质上可以理解为使用 npm link 进行连接调试
// 实际上采用 Lerna 进行内部 packages 包的链接
import { importEntry } from "import-html-entry";

import { MICRO_APP_CONTAINER_ID } from "./micros";

export function registerMicroApps(apps: RegisterApplicationConfig[]) {
  apps.forEach(registerApplication);
  start();
}

export async function fetchApp(url: string): Promise<LifeCycles> {
  // 1. 通过 window.fetch 请求 HTML 的 url 地址
  //    获取对应的文本字符串(url 地址需要支持跨域)

  // 2. 通过各种正则匹配 HTML 文本中的内联 CSS、外联 CSS、内联脚本、外联脚本

  // 3. 通过 window.fetch 请求外联 CSS,将其内联到微应用自身的 HTML 中
  //    解析的时候会通过注释的方式提供替换内联样式的占位符
  const { template, execScripts, getExternalScripts } = await importEntry(url);

  console.log("template", template);
  // 尽管 template 中已经通过 window.fetch 获取外联的 CSS 脚本
  // 但是还需要通过 window.fetch 请求获取并缓存微应用的 JS 脚本
  await getExternalScripts();
  // 将 HTML 挂载到 container 容器中
  const container = document.getElementById(MICRO_APP_CONTAINER_ID)!;
  container.innerHTML = template;
  // 1. 通过 eval 动态执行缓存的微应用脚本,
  //    注意不是使用 <script> 标签执行脚本
  //    qiankun 会进行沙箱隔离,该示例没有隔离处理

  // 2. 识别并返回微应用导出的生命周期函数
  const scriptExports: LifeCycles = await execScripts();
  // 封装成 single-spa 需要的微应用生命周期函数格式
  return {
    async bootstrap(props) {
      console.log("bootstrap", props);
      await execLifecycleFn(scriptExports, "bootstrap", props);
    },
    async mount(props) {
      const container = document.getElementById(MICRO_APP_CONTAINER_ID)!;
      // 挂载微应用时将微应用的 HTML(经过 import-html-entry 处理)挂载到 container 容器中
      container.innerHTML = template;
      await execLifecycleFn(scriptExports, "mount", props);
    },
    async unmount(props) {
      const container = document.getElementById(MICRO_APP_CONTAINER_ID)!;
      await execLifecycleFn(scriptExports, "unmount", props);
      // 卸载微应用时清除 container 容器元素的微应用内容
      container.innerHTML = "";
    },
  };
}

export async function execLifecycleFn(
  scriptExports: LifeCycles,
  lifecycle: keyof LifeCycles,
  props: AppProps
) {
  const lifecycleFn = scriptExports[lifecycle];
  if (Array.isArray(lifecycleFn)) {
    // 如果是数组,需要按顺序执行
    for (const fn of lifecycleFn) {
      await fn(props);
    }
  } else if (lifecycleFn) {
    await lifecycleFn(props);
  }
}
css 加载
通过 processTpl 获取到 template、styles 以及 scripts 后,import-html-entry 会将外联的 CSS 样式内联到 HTML 中,会通过 getEmbedHTML获取外联的 CSS 样式进行内联处理,如下所示:
<!DOCTYPE html>
<html lang="">
  <head>
    <style>
h3[data-v-469af010] {
  margin: 40px 0 0;
}
ul[data-v-469af010] {
  list-style-type: none;
  padding: 0;
}
li[data-v-469af010] {
  display: inline-block;
  margin: 0 10px;
}
a[data-v-469af010] {
  color: #42b983;
}


#app {
  font-family: Avenir, Helvetica, Arial, sans-serif;
  -webkit-font-smoothing: antialiased;
  -moz-osx-font-smoothing: grayscale;
  text-align: center;
  color: #2c3e50;
  margin-top: 60px;
}

</style>
</head>
  <body>
    <div id="app"></div>
  </body>
</html>Ï
JS 加载
- 如果 scriptUrl 已经请求过,则直接返回缓存的 Promise
- 如果是内联代码,则直接返回内联代码
- 否则通过 fetch 获取脚本内容
请求了所有微应用的 JS 脚本后,需要通过 execScripts 执行脚本
加载时优化
在 qiankun 中启动时默认会开启 prefetch 预加载功能,从而会默认执行 doPrefetchStrategy 预加载微应用。实现如下:
// src/prefetch.ts

// 预加载微应用的资源策略
// 1. prefetchStrategy 为数组时,预加载数组中的微应用
// 2. prefetchStrategy 为函数时,根据函数返回的结果预加载微应用
// 3. prefetchStrategy 为 true 时,等待第一个微应用加载完成后再预加载其他微应用,这是默认的模式
// 4. prefetchStrategy 为 'all' 时,立即预加载所有微应用
// 5. prefetchStrategy 为其他值时,不进行预加载
export function doPrefetchStrategy(
  apps: AppMetadata[],
  prefetchStrategy: PrefetchStrategy,
  importEntryOpts?: ImportEntryOpts,
) {
  const appsName2Apps = (names: string[]): AppMetadata[] => apps.filter((app) => names.includes(app.name));
  // 如果 prefetchStrategy 是数组,则预加载数组中的微应用
  if (Array.isArray(prefetchStrategy)) {
    // 根据数组中的微应用名称决定预加载哪些微应用
    // 需要在第一个微应用挂载完成后执行
    prefetchAfterFirstMounted(appsName2Apps(prefetchStrategy as string[]), importEntryOpts);
    // 如果 prefetchStrategy 是函数,则根据函数返回的结果预加载微应用
  } else if (isFunction(prefetchStrategy)) {
    (async () => {
      // critical rendering apps would be prefetch as earlier as possible
      // 1. criticalAppNames 为关键渲染应用的名称数组,这些应用会尽可能早地预加载
      // 2. minorAppsName 为非关键渲染应用的名称数组, 这些应用会在第一个应用加载完成后再预加载
      const { criticalAppNames = [], minorAppsName = [] } = await prefetchStrategy(apps);
      prefetchImmediately(appsName2Apps(criticalAppNames), importEntryOpts);
      prefetchAfterFirstMounted(appsName2Apps(minorAppsName), importEntryOpts);
    })();
  } else {
    switch (prefetchStrategy) {
      // 如果 prefetchStrategy 为 true,则等待第一个微应用加挂载完成后再预加载其他微应用
      case true:
        prefetchAfterFirstMounted(apps, importEntryOpts);
        break;
      // 如果 prefetchStrategy 为 'all',则立即预加载所有微应用
      case 'all':
        prefetchImmediately(apps, importEntryOpts);
        break;

      default:
        break;
    }
  }
}prefetchAfterFirstMounted实现如下:
// src/prefetch.ts

import { getAppStatus } from 'single-spa';

// 在第一个微应用挂载(注意不是加载)完成后再预加载其他微应用
function prefetchAfterFirstMounted(apps: AppMetadata[], opts?: ImportEntryOpts): void {
  // 监听 single-spa:first-mount 事件,等待第一个激活的微应用挂载完成
  window.addEventListener('single-spa:first-mount', function listener() {
    // 过滤出未加载的微应用
    const notLoadedApps = apps.filter((app) => getAppStatus(app.name) === NOT_LOADED);
    // 如果是开发环境,则打印日志
    if (process.env.NODE_ENV === 'development') {
      const mountedApps = getMountedApps();
      console.log(`[qiankun] prefetch starting after ${mountedApps} mounted...`, notLoadedApps);
    }
    // 遍历未加载的微应用,预加载微应用的资源
    notLoadedApps.forEach(({ entry }) => prefetch(entry, opts));
    // 移除 single-spa:first-mount 事件监听
    window.removeEventListener('single-spa:first-mount', listener);
  });
}其中prefetch很常用,具体实现在预加载关键资源中可以看
应用隔离
Css 隔离
CSS 具有作用域的概念,包括全局作用域、Shadow DOM 作用域以及局部作用域(Scoped CSS / Donut Scope)。
- 全局作用域是最常见的 CSS 作用域类型,所有在 CSS 文件或
<style>标签内定义的样式都会应用于 DOM 中所匹配的元素 - Shadow DOM 作用域则表示 CSS 样式的作用范围只会包括 Shadow DOM 内部的元素,不包括 Shadow DOM 外部的元素。除此之外,全局作用域的 CSS 样式同样不会在 Shadow DOM 中生效
- 目前有一种新的局部作用域提案 Scoping Styles: the @scope rule,它使用 At Rule
@scoped来限定局部作用域,Chrome 118 以上的版本支持,
qiankun 可以通过配置化的方式来决定是否开启 Shadow DOM 隔离还是 Scope 隔离。qiankun 的 CSS 隔离方案如下所示:
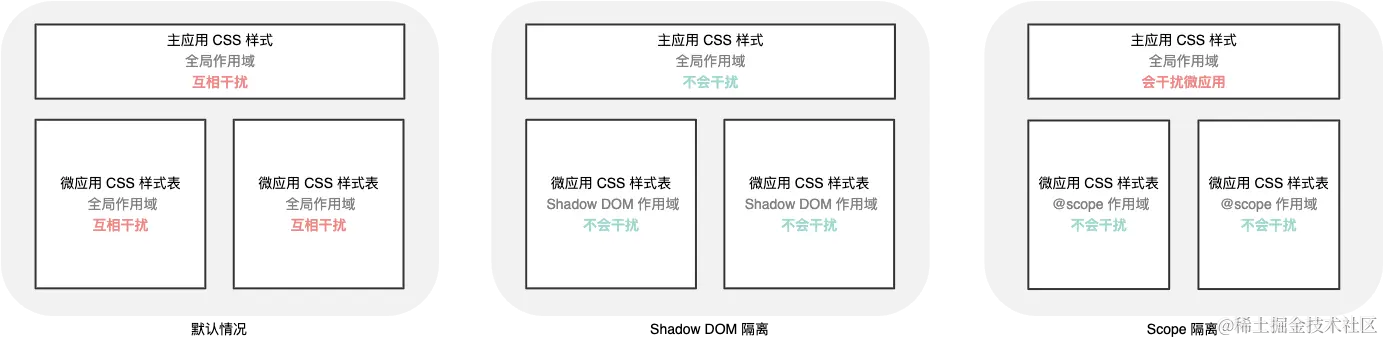
- Shadow DOM 隔离对于一些低版本的 React 应用会存在 React 事件的失效问题,为此可以使用兼容性更好的 Scoped CSS 隔离
- React 微应用的样式不会对主应用产生影响,但是主应用的样式会对微应用产生影响
- 可以发现开启 CSS 隔离后,微应用的 CSS 样式都被添加到各自的
<qiankun-head>中,而不是添加到主应用的<head>中,这样一旦卸载微应用,也会同时卸载对应的<qiankun-head>,从而减少样式干扰。
具体实现
createElement 的主要作用是将 template 字符串转换成 DOM, 根据沙箱配置对 CSS 进行 Shadow DOM 隔离或者 Scoped CSS 隔离处理,它的源码如下所示:
// 判断浏览器是否支持 Shadow DOM
const supportShadowDOM = !!document.head.attachShadow || !!(document.head as any).createShadowRoot;

// appContent: 微应用的字符串内容
// strictStyleIsolation: 是否启用严格样式隔离
// scopedCSS: 是否启用 Scoped 样式隔离
// appInstanceId: app 实例 id,例如 vue
function createElement(
  appContent: string,
  strictStyleIsolation: boolean,
  scopedCSS: boolean,
  appInstanceId: string,
): HTMLElement {
  // 创建一个 div 元素
  const containerElement = document.createElement('div');

  // appContent 是字符串,需要将其转换成 DOM 节点
  // innerHTML 可以解析包含在字符串中的 HTML 标签,并将其转换成 DOM 节点

  // 需要注意 innerHTML 解析的特性:
  // 1. 不会执行 script 标签中的脚本,例如 <script>alert('hello')</script>,不会执行 alert('hello')
  // 2. 不会转义字符串

  // textContent 会转义字符串,因此更加安全(当然两者功能不一样)

  // 将 appContent 转换成 DOM 节点
  containerElement.innerHTML = appContent;
  // appContent always wrapped with a singular div

  // 这里的 containerElement.firstChild 即为 <div id="__qiankun_microapp_wrapper_for_vue__" data-name="vue" data-version="2.10.16" data-sandbox-cfg=false>
  const appElement = containerElement.firstChild as HTMLElement;
  // 启用 Shadow DOM 隔离
  if (strictStyleIsolation) {
    // 如果浏览器不支持 Shadow DOM,则打印警告信息
    if (!supportShadowDOM) {
      console.warn(
        '[qiankun]: As current browser not support shadow dom, your strictStyleIsolation configuration will be ignored!',
      );
    } else {
      // 缓存 appElement 的所有子元素
      const { innerHTML } = appElement;
      // 清空 appElement 的所有子元素
      appElement.innerHTML = '';
      let shadow: ShadowRoot;

      if (appElement.attachShadow) {
        // 在 appElement 上创建一个 Shadow DOM
        shadow = appElement.attachShadow({ mode: 'open' });
      } else {
        // createShadowRoot was proposed in initial spec, which has then been deprecated
        shadow = (appElement as any).createShadowRoot();
      }
      // 将 appElement 的所有子元素添加到 Shadow DOM 中
      shadow.innerHTML = innerHTML;
    }
  }

  // 启用 Scoped 样式隔离
  if (scopedCSS) {
    const attr = appElement.getAttribute(css.QiankunCSSRewriteAttr);
    if (!attr) {
      appElement.setAttribute(css.QiankunCSSRewriteAttr, appInstanceId);
    }
    // 获取所有已经存在的样式节点
    const styleNodes = appElement.querySelectorAll('style') || [];
    // 遍历样式节点
    forEach(styleNodes, (stylesheetElement: HTMLStyleElement) => {
      // 处理样式节点,将所有的样式进行 Scoped 处理
      css.process(appElement!, stylesheetElement, appInstanceId);
    });
  }

  // 返回转换成 DOM 后的 <div id="__qiankun_microapp_wrapper_for_vue__" data-name="vue" data-version="2.10.16" data-sandbox-cfg=false>
  return appElement;
}
还需要对每个内联的CSS进行一些额外的处理,这里就不贴代码了。
对于 CSS 的处理主要分为两个部分,如下所示:
- 对于
<style>标签中已经存在 CSS 样式内容,进行 Scoped 处理- 对于所有根元素的样式(例如
html、body和:root),全部转换成 qiankun 的容器元素样式(微应用添加到主应用后不存在html、body等标签) - 对于所有以
html根元素开头的选择器(例如html > body、html body),去除html - 匹配选择器(如果是分组选择器则会以
,分割,例如body, p或被分割成body和,p)- 如果选择器中仍然存在
html、body和:root等根元素,全部转换成 qiankun 的容器元素 - 给所有分组选择器分割以后的每一组选择器添加 qiankun 容器元素的前缀(例如
a,p会被处理成div[data-name="vue"] a, div[data-name="vue"] p)
- 如果选择器中仍然存在
- 对于所有根元素的样式(例如
- 对于
<style>标签中不存在任何 CSS 内容,则监听 CSS 内容变化- 如果
<style>标签中的内容存在变化,则对变化后的内容进行上述 Scoped 步骤处理
- 如果
举一些具体的例子
- 将
body、html、:root替换成div[data-name="vue"]- body 样式是根样式,而在微应用中 body 对应的是 qiankun 的容器元素
div[data-name="vue"]
- body 样式是根样式,而在微应用中 body 对应的是 qiankun 的容器元素
"h1 { background-color: blue; }"返回:div[data-name="vue"] h1 {
css 动态隔离
上面只是 <style> 标签的内部样式处理,还需要处理微应用在执行期间动态增加的 <link> 和 <style>
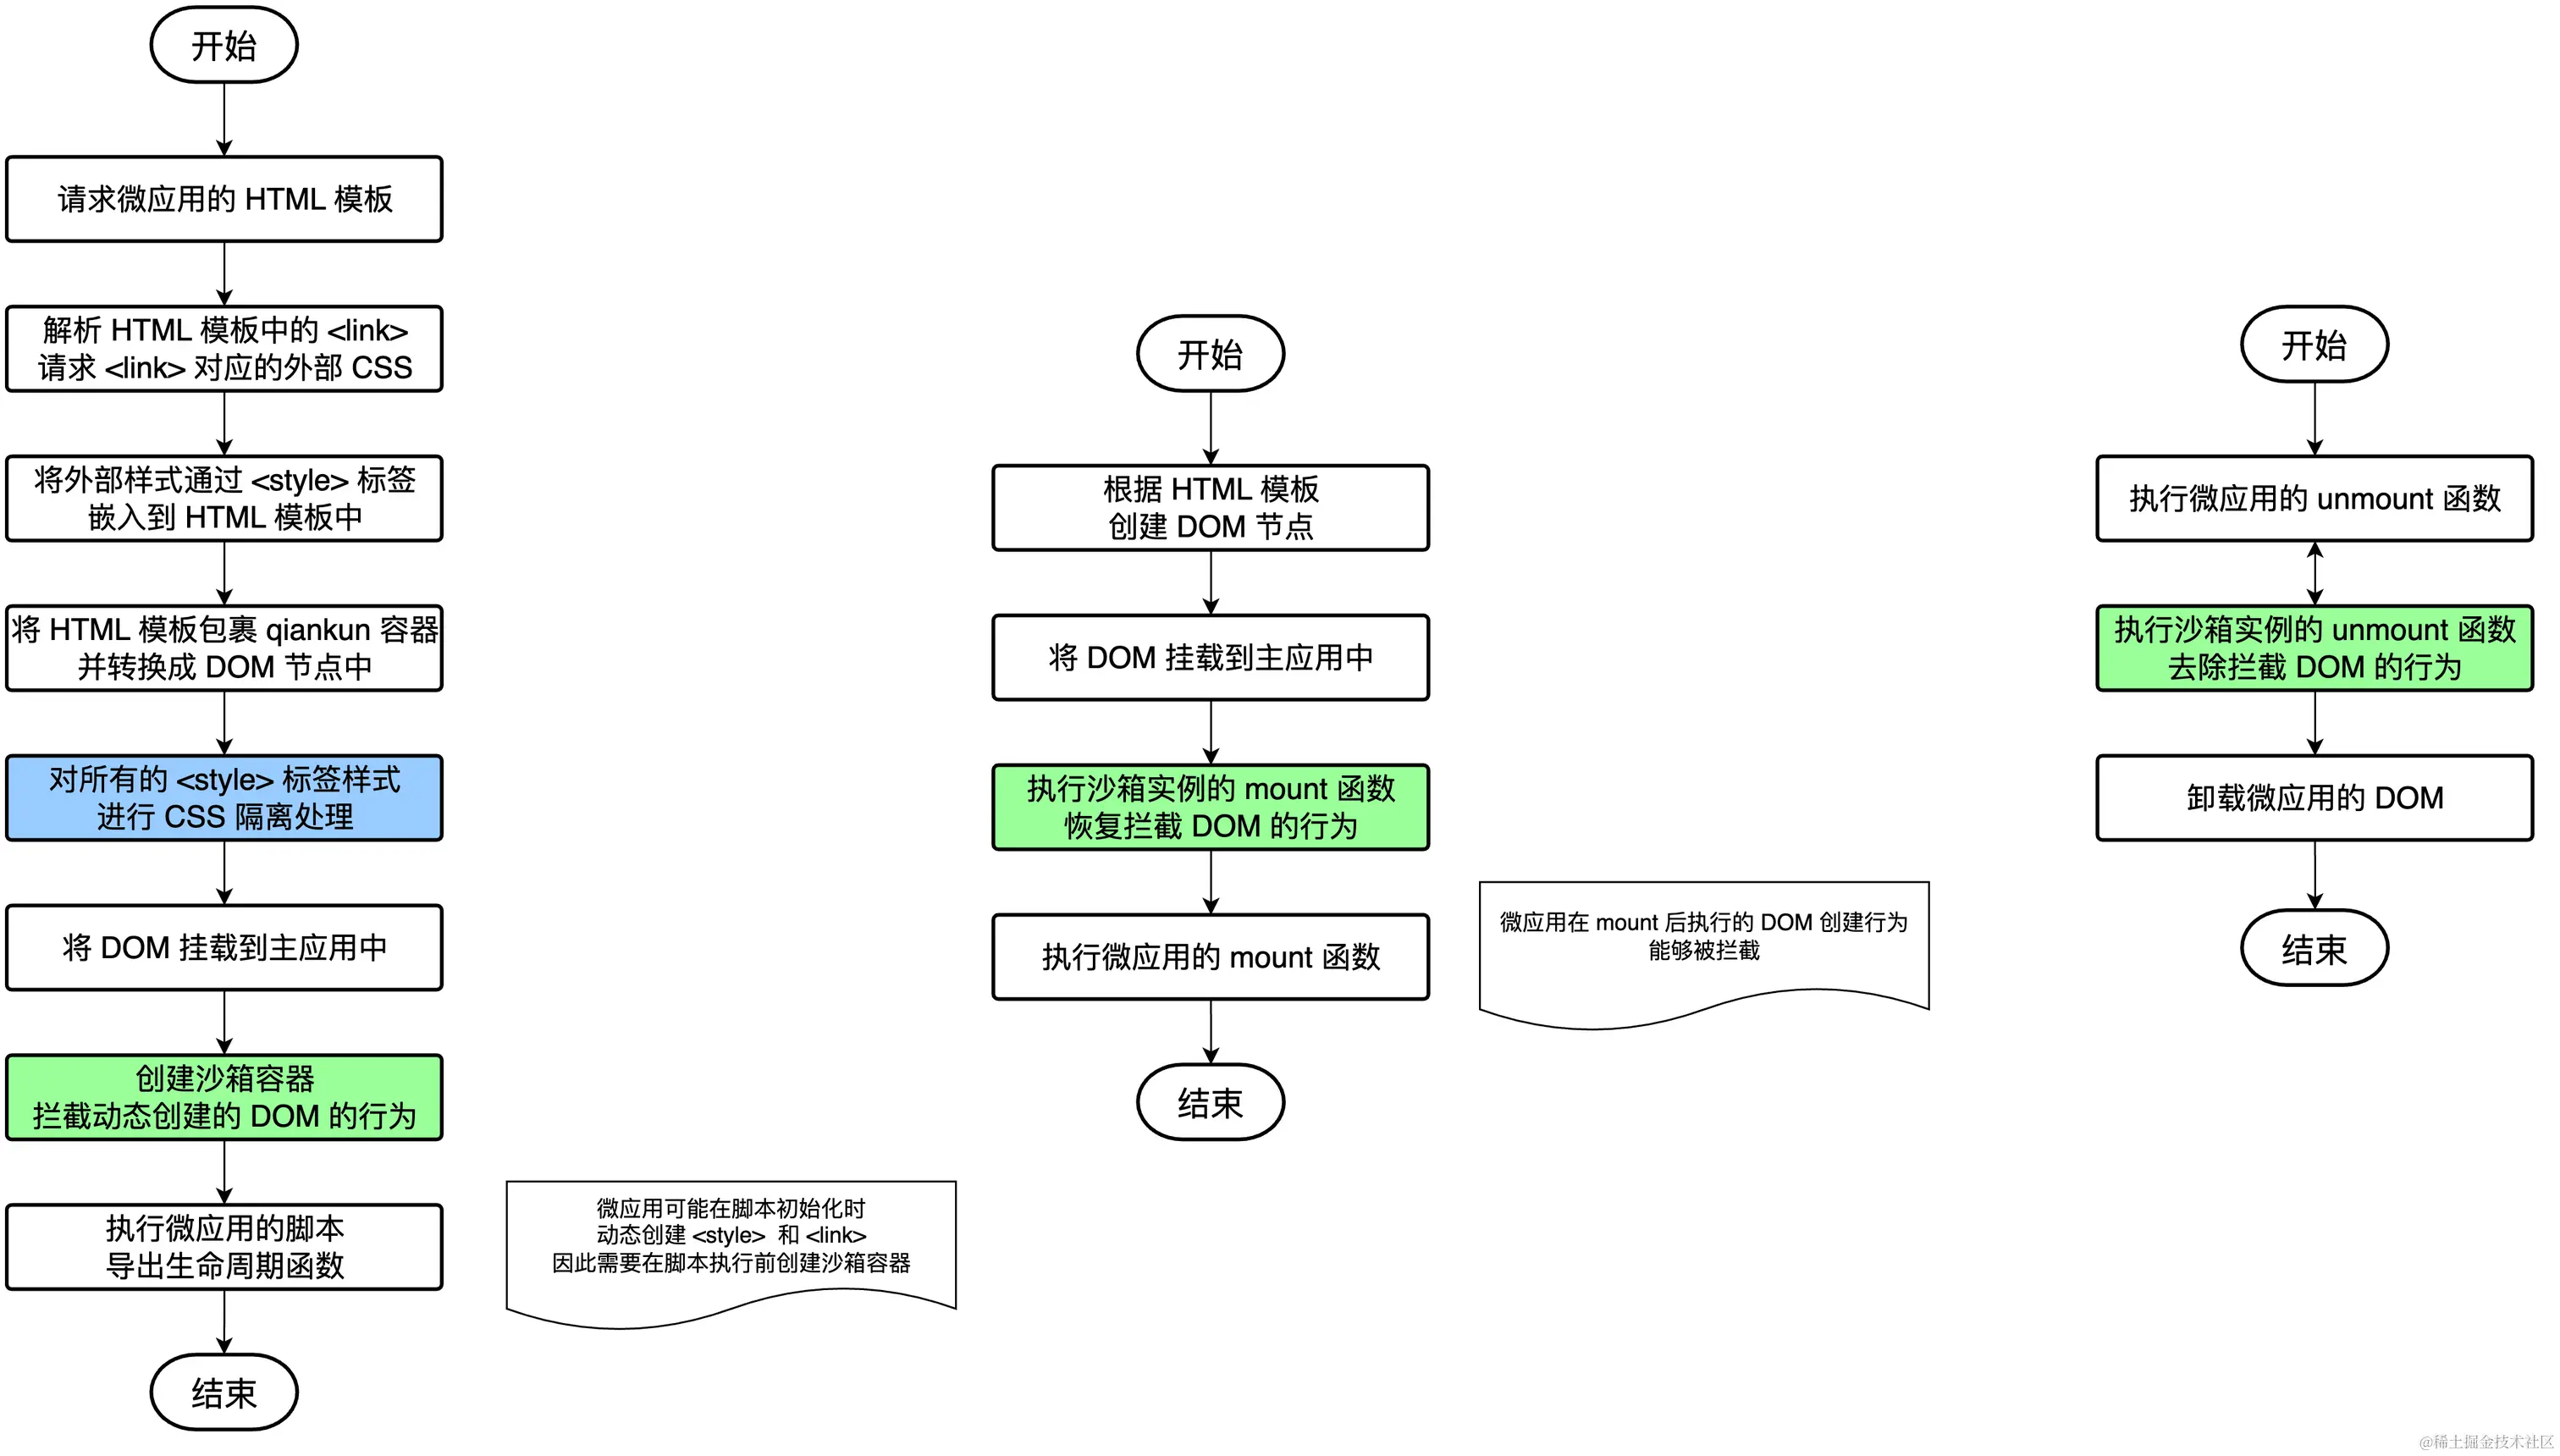
注意 qiankun 会在微应用的两个执行阶段之前重写 DOM 的添加逻辑,从而对需要动态添加的 <style> 和 <link> 进行拦截和隔离处理
具体实现
createSandboxContainer 用于在微应用的脚本执行之前创建沙箱实例,从而可以重写浏览器原生的 DOM API,对微应用的 DOM 操作进行管控。
主要干的事情:执行patchAtBootstrapping ➡️ 返回mount函数 ➡️ 返回unmount函数
/**
 * 生成应用运行时沙箱
 *
 * 沙箱分两个类型:
 * 1. app 环境沙箱
 *  app 环境沙箱是指应用初始化过之后,应用会在什么样的上下文环境运行。每个应用的环境沙箱只会初始化一次,因为子应用只会触发一次 bootstrap 。
 *  子应用在切换时,实际上切换的是 app 环境沙箱。
 * 2. render 沙箱
 *  子应用在 app mount 开始前生成好的的沙箱。每次子应用切换过后,render 沙箱都会重现初始化。
 *
 * 这么设计的目的是为了保证每个子应用切换回来之后,还能运行在应用 bootstrap 之后的环境下。
 **/
 export function createSandboxContainer(
  appName: string,
  elementGetter: () => HTMLElement | ShadowRoot,
  scopedCSS: boolean,
  useLooseSandbox?: boolean,
  excludeAssetFilter?: (url: string) => boolean,
  globalContext?: typeof window,
  speedySandBox?: boolean,
) {
  // .. 省略一些逻辑
return {

instance: sandbox,

    /**
     * 沙箱被 mount
     * 可能是从 bootstrap 状态进入的 mount
     * 也可能是从 unmount 之后再次唤醒进入 mount
     */
    async mount() {
     /* ------------------------------------------ 1. 启动/恢复 沙箱------------------------------------------ */
      sandbox.active();

      // 快照沙箱时
      // bootstrappingFreers 是 dynamicAppend/forLooseSandbox.ts 中 patchLooseSandbox 返回的函数 free
      // 注意这里是的 bootstrappingFreers 是一个数组,详见

      // export function patchAtBootstrapping(
      //   appName: string,
      //   elementGetter: () => HTMLElement | ShadowRoot,
      //   sandbox: SandBox,
      //   scopedCSS: boolean,
      //   excludeAssetFilter?: CallableFunction,
      //   speedySandBox?: boolean,
      // ): Freer[] {
      //   const patchersInSandbox = {
      //     [SandBoxType.LegacyProxy]: [
      //       () => patchLooseSandbox(appName, elementGetter, sandbox, false, scopedCSS, excludeAssetFilter),
      //     ],
      //     [SandBoxType.Proxy]: [
      //       () => patchStrictSandbox(appName, elementGetter, sandbox, false, scopedCSS, excludeAssetFilter, speedySandBox),
      //     ],
      //     [SandBoxType.Snapshot]: [
      //       () => patchLooseSandbox(appName, elementGetter, sandbox, false, scopedCSS, excludeAssetFilter),
      //     ],
      //   };

      //   返回的其实是一个数组,数组中的每一项是一个函数,这个函数的返回值是一个函数 free
      //   return patchersInSandbox[sandbox.type]?.map((patch) => patch());
      // }

      // 首次加载时 sideEffectsRebuilders 为空, sideEffectsRebuildersAtBootstrapping 为空
      // unmount 之后再次 mount:sideEffectsRebuilders 在 unmount 后存储为 [...bootstrappingFreers, ...mountingFreers].map((free) => free())
      // 此时 sideEffectsRebuildersAtBootstrapping 为 bootstrappingFreers 返回的 rebuild 函数
      const sideEffectsRebuildersAtBootstrapping = sideEffectsRebuilders.slice(0, bootstrappingFreers.length);
      // 首次加载时 sideEffectsRebuilders 为空, sideEffectsRebuildersAtMounting 为空
      // 再次加载时 sideEffectsRebuilders 在 unmount 后存储为 [...bootstrappingFreers, ...mountingFreers].map((free) => free())
      // 此时 sideEffectsRebuildersAtMounting 为 mountingFreers 返回的一系列 rebuild 函数
      const sideEffectsRebuildersAtMounting = sideEffectsRebuilders.slice(bootstrappingFreers.length);
       /* ------------------------------------------ 2. 开启全局变量补丁 ------------------------------------------*/
      // render 沙箱启动时开始劫持各类全局监听,尽量不要在应用初始化阶段有 事件监听/定时器 等副作用

      // 为什么尽量不要在应用初始化阶段有 事件监听/定时器 等副作用?
      // 因为 patchAtMounting 方法会劫持 window 对象的一些事件监听和定时器,例如 setInterval 和 clearInterval 方法
      // 如下所示:

      // export function patchAtMounting(
      //   appName: string,
      //   elementGetter: () => HTMLElement | ShadowRoot,
      //   sandbox: SandBox,
      //   scopedCSS: boolean,
      //   excludeAssetFilter?: CallableFunction,
      //   speedySandBox?: boolean,
      // ): Freer[] {

      //   // patchInterval 方法会劫持 window 对象的 setInterval 和 clearInterval 方法
      //   // 详见 src/sandbox/patchers/interval.ts
      //   // patchWindowListener 方法会劫持 window 对象的 addEventListener 和 removeEventListener 方法
      //   // 详见 src/sandbox/patchers/windowListener.ts
      //   // patchHistoryListener 方法会劫持 window 对象的 history.pushState、history.replaceState 和 hashchange 事件
      //   // 详见 src/sandbox/patchers/historyListener.ts
      //   const basePatchers = [
      //     () => patchInterval(sandbox.proxy),
      //     () => patchWindowListener(sandbox.proxy),
      //     () => patchHistoryListener(),
      //   ];

      //   // ...

      // }

      // patchAtMounting 方法会在每次应用加载的时候重新执行, 这个执行在应用初始化阶段之后
      // 微应用的代码已经执行,初始化已经完成,只是还未执行 mount 生命周期函数

      // 每次应用加载的时候,都会重新执行 patchAtMounting 方法
      mountingFreers = patchAtMounting(appName, elementGetter, sandbox, scopedCSS, excludeAssetFilter, speedySandBox);

      /* ------------------------------------------ 3. 重置一些初始化时的副作用 ------------------------------------------*/
      // 存在 rebuilder 则表明有些副作用需要重建

      // 首次加载时 sideEffectsRebuildersAtMounting 为空
      // 再次加载时 sideEffectsRebuildersAtMounting 为 mountingFreers 返回的一系列 rebuild 函数,注意此时 CSS 样式重建已经在 sideEffectsRebuildersAtBootstrapping 时完成
      // 此时的主要作用是清除 dynamicStyleSheetElements 数组中的元素
      if (sideEffectsRebuildersAtMounting.length) {
        sideEffectsRebuildersAtMounting.forEach((rebuild) => rebuild());
      }

      // clean up rebuilders
      // 重建完成后清空 sideEffectsRebuilders
      sideEffectsRebuilders = [];
      }
   async unmount() {
      // record the rebuilders of window side effects (event listeners or timers)
      // note that the frees of mounting phase are one-off as it will be re-init at next mounting
      // 记录 window 副作用(事件监听器或定时器)的重建器
      // 注意,mounting 阶段的释放是一次性的,因为它将在下次 mounting 时重新初始化

      // 执行完 free 函数后,free 函数会返回一个函数 rebuild,这个函数会被 push 到 sideEffectsRebuilders 数组中
      // 注意只有 patchLooseSandbox 和  patchStrictSandbox  返回的 free 函数会返回 rebuild 函数,
      // patchInterval、patchWindowListener、patchHistoryListener 返回的 free 函数返回的 rebuild 函数为 noop(不需要 rebuild 处理)

      // 因为 patchLooseSandbox 和 patchStrictSandbox
      sideEffectsRebuilders = [...bootstrappingFreers, ...mountingFreers].map((free) => free());

      sandbox.inactive();
    },
}
}
patchHTMLDynamicAppendPrototypeFunctions 的作用是重写 DOM 原生 API,dynamicStyleSheetElements 的作用是缓存动态增加的 <style> 和 <link> 元素(经过沙箱隔离处理),以便在微应用重新加载时无须再次对动态添加的样式进行隔离计算和处理。free 函数用于在微应用卸载时恢复重写的 DOM 原生 API,从而防止对主应用的执行产生影响。
// packages/qiankun/src/sandbox/patchers/dynamicAppend/common.ts

export function patchHTMLDynamicAppendPrototypeFunctions(
  isInvokedByMicroApp: (element: HTMLElement) => boolean,
  containerConfigGetter: (element: HTMLElement) => ContainerConfig,
) {
  // 缓存 head 和 body 的原始 appendChild 方法
  const rawHeadAppendChild = HTMLHeadElement.prototype.appendChild;
  const rawBodyAppendChild = HTMLBodyElement.prototype.appendChild;
  // 缓存 head 的原始 insertBefore 方法
  const rawHeadInsertBefore = HTMLHeadElement.prototype.insertBefore;

  // Just overwrite it while it have not been overwritten
  // 如果没有被重写,则重写
  if (
    rawHeadAppendChild[overwrittenSymbol] !== true &&
    rawBodyAppendChild[overwrittenSymbol] !== true &&
    rawHeadInsertBefore[overwrittenSymbol] !== true
  ) {
    // 重写 head 的 appendChild 方法
    HTMLHeadElement.prototype.appendChild = getOverwrittenAppendChildOrInsertBefore({
      // 原始的 appendChild 方法
      rawDOMAppendOrInsertBefore: rawHeadAppendChild,
      // 由外部传入的获取容器配置的方法
      // containerConfigGetter = () => ({
      //   appName,
      //   appWrapperGetter,
      //   proxy,
      //   strictGlobal: false,
      //   speedySandbox: false,
      //   scopedCSS,
      //   dynamicStyleSheetElements,
      //   excludeAssetFilter,
      // }),
      containerConfigGetter,
      // 用于判断是否是激活的微应用
      isInvokedByMicroApp,
      target: 'head',
    }) as typeof rawHeadAppendChild;
    HTMLBodyElement.prototype.appendChild = getOverwrittenAppendChildOrInsertBefore({
      rawDOMAppendOrInsertBefore: rawBodyAppendChild,
      containerConfigGetter,
      isInvokedByMicroApp,
      target: 'body',
    }) as typeof rawBodyAppendChild;

    HTMLHeadElement.prototype.insertBefore = getOverwrittenAppendChildOrInsertBefore({
      rawDOMAppendOrInsertBefore: rawHeadInsertBefore as any,
      containerConfigGetter,
      isInvokedByMicroApp,
      target: 'head',
    }) as typeof rawHeadInsertBefore;
  }

  // 缓存 head 和 body 的原始 removeChild 方法
  const rawHeadRemoveChild = HTMLHeadElement.prototype.removeChild;
  const rawBodyRemoveChild = HTMLBodyElement.prototype.removeChild;
  // Just overwrite it while it have not been overwritten
  // 如果没有被重写,则重写
  if (rawHeadRemoveChild[overwrittenSymbol] !== true && rawBodyRemoveChild[overwrittenSymbol] !== true) {
    // 重写 head 和 body 的 removeChild 方法
    HTMLHeadElement.prototype.removeChild = getNewRemoveChild(
      rawHeadRemoveChild,
      containerConfigGetter,
      'head',
      isInvokedByMicroApp,
    );
    HTMLBodyElement.prototype.removeChild = getNewRemoveChild(
      rawBodyRemoveChild,
      containerConfigGetter,
      'body',
      isInvokedByMicroApp,
    );
  }

  // 返回一个取消 patch 的方法
  return function unpatch() {
    // 恢复 head 和 body 的原始 appendChild 和 removeChild 方法
    HTMLHeadElement.prototype.appendChild = rawHeadAppendChild;
    HTMLHeadElement.prototype.removeChild = rawHeadRemoveChild;
    HTMLBodyElement.prototype.appendChild = rawBodyAppendChild;
    HTMLBodyElement.prototype.removeChild = rawBodyRemoveChild;
    // 恢复 head 的原始 insertBefore 方法
    HTMLHeadElement.prototype.insertBefore = rawHeadInsertBefore;
  };
}
而 unmount 后,qiankun 会调用 clearInterval 方法,清除微应用中调用的定时器,事件和 history 的 patch 也是类似的
import { noop } from 'lodash';

const rawWindowInterval = window.setInterval;
const rawWindowClearInterval = window.clearInterval;

export default function patch(global: Window) {
  let intervals: number[] = [];

  global.clearInterval = (intervalId: number) => {
    intervals = intervals.filter((id) => id !== intervalId);
    return rawWindowClearInterval.call(window, intervalId as any);
  };

  global.setInterval = (handler: CallableFunction, timeout?: number, ...args: any[]) => {
    const intervalId = rawWindowInterval(handler, timeout, ...args);
    intervals = [...intervals, intervalId];
    return intervalId;
  };

  return function free() {
    // free 执行时会清除所有的定时器
    intervals.forEach((id) => global.clearInterval(id));
    global.setInterval = rawWindowInterval;
    global.clearInterval = rawWindowClearInterval;

    return noop;
  };
}
快照隔离
从宏观层面描述,多个不同站点的网页之间,会产生新的带有沙箱环境 的 Renderer 进程,从而隔离应用的存储、浏览上下文、DOM 以及 JS 运行环境等。
// packages/qiankun/src/sandbox/snapshotSandbox.ts

/**
 * @author Hydrogen
 * @since 2020-3-8
 */
import type { SandBox } from '../interfaces';
import { SandBoxType } from '../interfaces';

// 遍历 window 对象,将 window 对象的自有属性和方法都传入 callbackFn 中
function iter(obj: typeof window, callbackFn: (prop: any) => void) {
  // const obj = {
  //   ownProp: 'I am an own property',
  // };
  // Object.prototype.protoProp = 'I am a prototype property';
  // console.log(obj.hasOwnProperty('ownProp')); // true
  // console.log(obj.hasOwnProperty('protoProp')); // false
  // console.log('protoProp' in obj); // true

  for (const prop in obj) {
    // 如果是对象自身的属性,或者是 clearInterval 方法,就调用 callbackFn
    // patch for clearInterval for compatible reason, see #1490

    // 为什么这里要判断 obj.hasOwnProperty(prop)?
    // 1. 通常情况下我们在设计微应用代码时,不会直接修改 window 对象的原型链上的属性,而是直接修改 window 对象自身的属性
    // 2. 原型链上的属性是共享的,如果记录了原型链上的属性,那么在恢复环境时,会影响到其他应用
    // 3. 可以减少快照沙箱的内存占用提高处理性能
    // 4. 处理原型链上的属性会增加复杂度,因为需要遍历整个原型链

    // 为什么这里要判断 clearInterval 方法?
    // 详见:https://github.com/umijs/qiankun/issues/872

    // 在开启沙箱之前,会 patch window 对象的 setInterval 和 clearInterval 方法
    // 详见 src/sandbox/patchers/interval.ts
    if (obj.hasOwnProperty(prop) || prop === 'clearInterval') {
      callbackFn(prop);
    }
  }
}

/**
 * 基于 diff 方式实现的沙箱,用于不支持 Proxy 的低版本浏览器
 */
export default class SnapshotSandbox implements SandBox {
  proxy: WindowProxy;

  name: string;

  type: SandBoxType;

  sandboxRunning = true;

  private windowSnapshot!: Window;

  private modifyPropsMap: Record<any, any> = {};

  constructor(name: string) {
    this.name = name;
    // proxy 是 window 对象的代理对象
    // 在快照沙箱中,没有 proxy 代理功能,所以这里直接将 window 对象赋值给 proxy
    this.proxy = window;
    this.type = SandBoxType.Snapshot;
  }

  // 微应用 mount 时触发,注意在微应用生命周期函数 mount 之前调用
  active() {
    // 记录当前快照
    this.windowSnapshot = {} as Window;
    iter(window, (prop) => {
      // 遍历 window 对象,记录微应用 mount 执行前的 window 快照
      this.windowSnapshot[prop] = window[prop];
    });

    // 恢复之前的变更(注意每一个微应用都会 new 一个新的 SnapshotSandbox 沙箱实例,所以这里的 modifyPropsMap 和微应用一一对应)
    // 这里的 modifyPropsMap 记录的是上一次微应用执行期间 window 对象的属性变更
    Object.keys(this.modifyPropsMap).forEach((p: any) => {
      window[p] = this.modifyPropsMap[p];
    });

    this.sandboxRunning = true;
  }

  // 微应用 unmount 时触发,注意在微应用生命周期函数 unmount 之后调用
  inactive() {
    this.modifyPropsMap = {};
    iter(window, (prop) => {
      // 微应用卸载后,此时 window 对象可能存在一些属性被修改,需要将这些属性恢复到微应用 mount 执行前的快照
      if (window[prop] !== this.windowSnapshot[prop]) {
        // 记录微应用执行期间 window 对象的属性变更
        this.modifyPropsMap[prop] = window[prop];
        // 恢复 window 对象的快照
        window[prop] = this.windowSnapshot[prop];
      }
    });

    if (process.env.NODE_ENV === 'development') {
      console.info(`[qiankun:sandbox] ${this.name} origin window restore...`, Object.keys(this.modifyPropsMap));
    }

    this.sandboxRunning = false;
  }

  patchDocument(): void {}
}
快照隔离的代码实现非常简单,需要注意的是快照隔离时不会记录和恢复 window 对象原型链上的属性变更,因为原型链上的变更一般都需要共享。